
The Dyson DC60 is known for its powerful suction and cleaning capabilities, but like any vacuum cleaner, it can experience issues over time. One common problem that many Dyson DC60 owners face is a non-spinning turbine brush bar. This issue can significantly reduce your vacuum’s effectiveness, especially on carpets where the rotating brush is essential for deep cleaning.
Affiliate disclosure: As an Amazon associate, We'll earn a commission for every successful order through our affiliate links in the article. However, you won’t be charged anything for this.
When your Dyson DC60’s turbine stops turning, it can be frustrating, but the good news is that many of these problems can be resolved with some troubleshooting and maintenance. This article will guide you through the most common causes of a non-spinning turbine brush bar and provide detailed steps to diagnose and fix the issue. Whether you’re dealing with a clogged brush bar, a worn-out belt, or more complex mechanical problems, we’ll help you get your Dyson DC60 back to peak performance.
Common Causes of a Non-Spinning Turbine
When your Dyson DC60 turbine brush bar refuses to spin, several factors could be at play. Identifying the root cause is the first step toward an effective solution. Here are the most frequent culprits behind this common vacuum cleaner problem:
Blockages and Obstructions
The most common reason for a non-spinning brush bar is the accumulation of hair, string, or debris around the brush roll. Over time, these materials can become tightly wound around the brush bar, creating enough resistance to prevent rotation. Even vacuums with strong suction power can experience this issue, as the debris might not be visible from a casual inspection.
Belt Problems
The belt that drives the brush bar can wear out, stretch, or break entirely. This component is responsible for transferring power from the motor to the brush bar, and when compromised, the brush bar will remain stationary despite the motor running properly.
Motor Malfunctions
The motor that powers the brush bar can fail due to electrical issues, overuse, or general wear and tear. If the motor isn’t receiving power or has burned out, the brush bar won’t turn regardless of the condition of other components.
Electrical Connection Issues
Loose or damaged wiring between the main vacuum unit and the brush head can interrupt the power supply to the brush bar motor. This is particularly common in older models or vacuums that have been heavily used.
Mechanical Friction
Internal components can develop excessive friction points that prevent smooth rotation. This might be due to worn-out bearings, misaligned parts, or damage to the turbine mechanism itself.
Structural Damage
Physical damage to key components, such as a cracked housing or broken internal parts, can completely halt brush rotation. This type of damage often requires replacement of specific parts rather than simple cleaning or adjustment.
Comprehensive Troubleshooting Guide
Initial Safety Precautions
Before attempting any repairs on your Dyson DC60, follow these essential safety steps:
- Unplug the vacuum completely from the power source
- Place the vacuum on a clean, flat surface with good lighting
- Have appropriate tools ready before beginning any disassembly
- Consider wearing gloves to protect your hands from sharp edges or debris
Basic Inspection Procedure
Checking for Visible Obstructions
- Turn the vacuum upside down to expose the brush bar
- Visually inspect the brush bar for wrapped hair, string, or other debris
- Use scissors to carefully cut away any visible entanglements
- Gently pull removed material away from the brush bar
- Manually rotate the brush bar to check if it spins freely after cleaning
Testing Suction and Airflow
- Remove the brush head from the vacuum wand
- Turn on the vacuum and check for strong suction at the wand
- If suction is weak, check for blockages in the main vacuum pathways
- Ensure the dust bin is not full or obstructing airflow
- Check that filters are clean and properly installed
Advanced Repair Techniques for Dyson DC60
Disassembling the Brush Head
Required Tools
- Star-head (Torx) screwdriver
- Small flathead screwdriver
- Scissors or cutting tool
- Clean cloth for wiping components
Step-by-Step Disassembly Process
- Turn the vacuum upside down to access the brush head
- Locate the star-patterned screws on the brush head housing
- Remove all screws and set them aside in a safe place
- Carefully separate the top and bottom housing sections
- Note the position of all components for easier reassembly
Addressing Belt Issues
If the belt is damaged, worn, or broken, a replacement is necessary to restore the brush bar’s functionality.
- Once the brush head is open, locate the drive belt
- Inspect the belt for signs of wear, stretching, or breaks
- If damaged, remove the old belt by sliding it off the motor shaft and brush bar
- Install a new compatible belt by looping it around the motor shaft first
- Stretch the belt carefully to position it around the brush bar
- Ensure the belt has proper tension—not too tight or too loose
- Manually rotate the brush bar to verify the belt moves smoothly
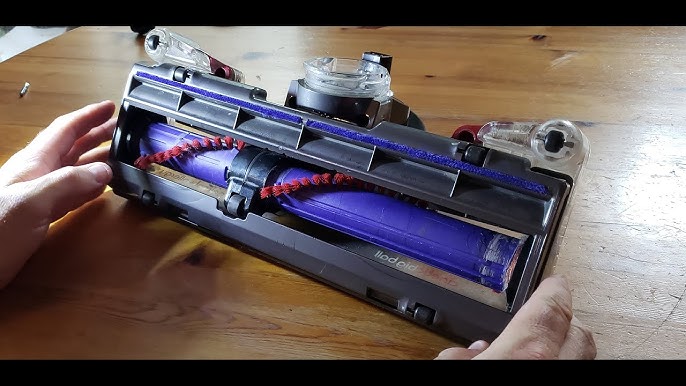
Clearing Hair from Drive Mechanisms
Hair accumulation is a primary cause of turbine failure in the Dyson DC60. Here’s how to thoroughly address this issue:
- After opening the brush head, locate the drive shaft and turbine mechanism
- Use fingers or tweezers to carefully remove any visible hair
- For tightly wound hair, use scissors to cut through the accumulated mass
- Pay special attention to the areas behind the brush head and around bearings
- Check the turbine housing for hair that may have been pulled into the mechanism
- Clean all components thoroughly before reassembly
- For stubborn hair in hard-to-reach areas, consider using compressed air
Addressing Motor and Electrical Issues
If cleaning the connections doesn’t solve the problem, the motor itself might be faulty and require replacement.
- Check all visible wiring for damage or disconnections
- Inspect the two pins at the base of the brush head for dirt or corrosion
- Clean connection points with a dry cloth or cotton swab
- Ensure all connectors along the shaft are secure
- If the motor appears damaged, test it with a multimeter if you have the technical knowledge
- For motor issues that can’t be resolved through cleaning or reconnection, replacement may be necessary
Dealing with Structural Damage
For completely broken parts, a replacement is usually the best option.
- Identify the damaged part and assess if repair is possible
- For cracked plastic components, consider appropriate plastic adhesives
- For completely broken parts, replacement is usually the best option
- For the white plastic piece that’s critical to brush rotation:
- Check online for replacement parts from Dyson or authorized dealers
- Consider third-party replacements that may be more cost-effective
- For tech-savvy users, 3D printing replacement parts is a viable option
Lubrication Techniques
Proper lubrication can restore smooth operation:
- After cleaning all components, apply a small amount of silicone spray to moving parts
- Focus on bearings and other friction points
- Avoid over-lubricating, as excess lubricant can attract more dust and debris
- Wipe away any excess lubricant before reassembly
- Avoid using WD-40 on components that will contact dust, as it can create a sticky residue
Reassembly and Testing
Proper Reassembly Sequence
- Begin reassembly by positioning the brush bar correctly in its housing
- Ensure the belt is properly seated on both the motor shaft and brush bar
- Verify that any springs or small components are in their correct positions
- Align the top and bottom housing sections carefully
- Replace all screws, starting with corner screws to ensure proper alignment
- Tighten screws firmly but avoid over-tightening, which could crack the plastic
Testing After Repair
- After reassembly, manually rotate the brush bar to check for free movement
- Reconnect the brush head to the vacuum
- Turn on the vacuum and observe if the brush bar spins properly
- Listen for unusual noises that might indicate remaining problems
- Test the vacuum on different surfaces to ensure proper cleaning performance
- If the brush bar still doesn’t spin, review the troubleshooting steps to identify missed issues
Preventive Maintenance Tips
Regular Cleaning Routine
Establishing a regular maintenance schedule can prevent future turbine issues:
- After each use, check the brush bar for wrapped hair or string
- Remove the brush bar monthly for thorough cleaning
- Clean filters according to Dyson’s recommended schedule
- Empty the dust bin before it reaches maximum capacity
- Wipe the exterior of the vacuum and brush head to prevent dust buildup
Early Warning Signs to Watch For
Be alert for these indicators of potential problems:
- Unusual noises during operation
- Reduced suction power
- Intermittent brush bar operation
- Visible wear on the brush bar bristles
- Difficulty pushing the vacuum on carpeted surfaces
Proper Usage Habits
- Adjust height settings appropriately for different floor surfaces
- Avoid vacuuming large objects that could jam the brush bar
- Turn off the brush roll when cleaning delicate surfaces
- Allow the vacuum to cool down during extended cleaning sessions
- Store the vacuum in a clean, dry place when not in use
Frequently Asked Questions (FAQ)
Why does my Dyson DC60 turbine stop spinning after a few minutes of use?
This intermittent operation often indicates overheating or a partial blockage. The thermal cut-out feature may be activating to protect the motor. Check for hair buildup around the brush bar ends and bearings, as this creates friction and heat. Also, ensure the belt isn’t too tight, which can cause strain on the motor. Allow the vacuum to cool completely before resuming use, and consider shorter cleaning sessions if the problem persists.
Can I replace the Dyson DC60 turbine motor myself?
Yes, you can replace the turbine motor yourself with moderate technical skills. The process requires disassembling the brush head using a Torx screwdriver, disconnecting the old motor, and installing the replacement. Ensure you purchase the correct motor model for the DC60. The procedure takes approximately 30-45 minutes and can save significant repair costs. However, if you’re uncomfortable with electrical components, professional servicing is recommended.
Why is my Dyson DC60 making a grinding noise when the brush bar tries to turn?
A grinding noise typically indicates mechanical friction between components. The most common causes are hair wrapped tightly around the brush bar ends or damaged bearings. Disassemble the brush head to inspect the bearings and drive shaft. Remove any hair or debris and check for worn or damaged parts. If the bearings are damaged, they’ll need replacement. Applying appropriate lubricant to moving parts after cleaning can also help eliminate the grinding noise.
How often should I replace the belt in my Dyson DC60 turbine?
The belt in a Dyson DC60 typically needs replacement every 12-18 months with regular use. Signs that indicate belt replacement include visible wear (cracks, stretching), inconsistent brush bar rotation, or a burning smell during operation. Regular inspection of the belt during routine cleaning can help you identify wear before complete failure occurs. Keep a spare belt on hand for quick replacement when needed.
Is it normal for hair to accumulate in the Dyson DC60 turbine mechanism?
Yes, hair accumulation is a common issue with all vacuum brush bars, including the Dyson DC60. The rotating action tends to pull hair into the ends of the brush bar and around the drive mechanism. This is normal but requires regular maintenance to prevent problems. Establishing a monthly routine of removing the brush bar and clearing accumulated hair will significantly extend the life of your vacuum and maintain optimal performance.
Conclusion
The Dyson DC60’s non-spinning turbine issue, while frustrating, is typically resolvable with proper troubleshooting and maintenance. Most problems stem from common causes like hair accumulation, belt wear, or mechanical obstructions that can be addressed through careful disassembly, cleaning, and part replacement when necessary.
By following the comprehensive guide outlined in this article, you can diagnose and fix most turbine problems without requiring professional service. Regular maintenance—particularly removing hair from the brush bar and drive mechanisms—is the key to preventing future issues and extending the lifespan of your vacuum.
Remember that prevention is always easier than repair. Implementing a consistent cleaning routine for your Dyson DC60 will help maintain its performance and avoid the inconvenience of a non-functioning turbine. With proper care, your Dyson vacuum can continue to provide effective cleaning for many years to come.


