

The Dyson DC25 vacuum is renowned for its powerful suction and ball technology, but many users encounter issues with the recline mechanism over time. When your vacuum won’t properly recline, it can make cleaning carpets and reaching under furniture nearly impossible. This comprehensive guide explores the common causes behind DC25 recline failures and provides detailed, step-by-step solutions to get your vacuum working properly again.
Affiliate disclosure: As an Amazon associate, We'll earn a commission for every successful order through our affiliate links in the article. However, you won’t be charged anything for this.
If you’ve found yourself struggling to push your DC25 forward or noticed it’s no longer making proper contact with your floors, you’re not alone. These recline problems typically stem from mechanical issues within the hinge system or the red release bar mechanism. The good news is that many of these problems can be resolved without professional help.
The Dyson DC25 Recline Mechanism Explained
The DC25’s recline feature relies on a carefully designed mechanism that allows the vacuum to transition from its upright locked position to a reclined cleaning position. At the heart of this system is the red release bar located near the base of the handle. When functioning correctly, pressing this bar disengages the locking mechanism, allowing the vacuum to tilt backward for effective floor cleaning.
This mechanism consists of several key components working together:
- The red release bar that users press to initiate reclining
- Internal sliding brackets that disengage when the bar is pressed
- Hinge points that allow smooth movement between positions
- The upright lock mechanism that secures the vacuum when standing
When any of these components becomes damaged, loose, or obstructed, the recline function can fail partially or completely. Users typically notice this problem when they press the red bar and the vacuum either doesn’t recline at all or only reclines slightly, making it difficult to maneuver during cleaning.
Common Causes of DC25 Recline Failures
Damaged or Worn Brackets
The DC25 relies on two sliding brackets for its recline mechanism. One bracket is positioned on the right-hand side with a supporting hole, while another sits beneath a protective cover. These brackets can wear down or snap over time, especially with frequent use. When damaged, they fail to properly disengage the locking mechanism when you press the red bar.
Loose Screws in the Upright Lock Mechanism
A single screw secures the upright bar to the housing in the lock mechanism. Over time, this screw can loosen due to the regular vibrations that occur during vacuum operation. When loose, the upright lock may fail to properly engage or disengage, preventing smooth reclining.
Debris Accumulation
Dust, hair, and other debris can accumulate around the recline mechanism, creating friction and preventing smooth operation. This is particularly common in households with pets or long-haired family members.
Hinge Stiffness or Damage
The hinges that allow the vacuum to recline can become stiff from lack of lubrication or damaged from forceful handling. When the hinges don’t move freely, the vacuum won’t recline properly even when the release mechanism is working.
Troubleshooting Your DC25 Recline Issues: Step-by-Step Solutions
Inspecting and Cleaning the Recline Mechanism
Preliminary Inspection
- Ensure the vacuum is unplugged before beginning any maintenance
- Press the red bar and observe how far the vacuum reclines
- Listen for any unusual clicking or grinding sounds when attempting to recline
- Check for visible obstructions around the red bar and hinge points
Cleaning the Mechanism
- Use a soft brush to remove any visible dust or debris around the red bar
- Gently clean around the hinge points where the handle connects to the ball unit
- Use compressed air (if available) to blow out any stubborn debris from tight spaces
- Wipe down the entire mechanism area with a slightly damp cloth
Fixing the Upright Lock Mechanism
If your initial inspection suggests the upright lock mechanism is the culprit, follow these detailed steps to address the issue:
Accessing the Lock Mechanism
- Unplug the vacuum and place it on a clean, flat surface
- Remove the pre-motor filter by pressing the release catch and lifting it out
- Locate the four Torx screws on either side of the Ball housing
- Using a Torx screwdriver (typically T15 size), carefully remove these screws
- Gently detach the side panel to expose the internal components
Tightening the Loose Screw
- Identify the upright lock mechanism near where the handle connects to the ball
- Locate the single screw that secures the upright bar to the housing
- If loose, use your Torx screwdriver to tighten it firmly
- For additional security, you can use vice grips to apply extra torque, ensuring the screw won’t loosen again
- Test the recline function before reassembling the vacuum
Reassembly
- Reattach the side panel to the Ball housing
- Replace and tighten the four Torx screws
- Reinstall the pre-motor filter
- Test the recline function several times to ensure proper operation
Repairing Broken Brackets
If you’ve determined that a broken bracket is causing your recline issues, you have two options: replacement or a clever workaround.
If you find that the bracket is damaged and needs replacing, here is a product recommendation.
Option 1: Bracket Replacement
- Follow the steps above to access the internal components
- Locate the damaged bracket (commonly found beneath the protective cover)
- Remove any fasteners securing the broken bracket
- Install the replacement bracket, ensuring proper alignment
- Secure with original fasteners and test before reassembling
Option 2: Bracket Workaround
If you don’t have a replacement bracket, this creative solution has worked for many users:
1. Access the internal components as described above
2. Remove the remnants of the broken bracket
3. Find a short screw that can span from one side of the mechanism to the other
4. Insert the screw through the existing holes where the bracket was attached
5. Secure with a nut on the opposite side, tightening just enough to allow movement
6. Test the recline function before reassembling
Lubricating the Hinge Mechanism
Stiff hinges can often be resolved with proper lubrication:
If you need a lubricant for the hinge mechanism, a silicone-based lubricant is recommended.
Silicone Lubricant Spray
WD-40 Specialist Silicone Lubricant

Multi-surface protection with quick-drying film
B’laster Industrial Silicone Lubricant
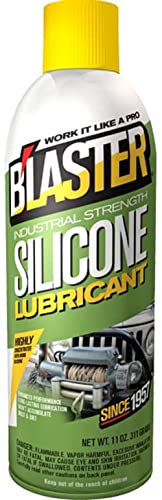
Long-lasting lubrication for metal and rubber
Permatex Silicone Spray Lubricant

Industrial-strength waterproof protection
CRC Water Based Silicone Lubricant

Non-flammable multi-purpose lubricant
- Locate all hinge points where the handle connects to the base of the vacuum
- Apply a small amount of silicone-based lubricant or WD-40 to each hinge point
- Avoid using excessive lubricant, as this can attract more dust
- Move the handle up and down several times to work the lubricant into the mechanism
- Wipe away any excess lubricant with a clean cloth
Addressing Red Bar Issues
If the red bar itself seems to be the problem, try these solutions:
Freeing a Stuck Red Bar
- Press and release the red bar several times to potentially dislodge any obstruction
- If the bar feels sticky, apply a tiny amount of lubricant to the sides where it meets the housing
- Use a thin plastic tool to gently press around the edges of the bar to free it from any binding
Resetting the Red Bar Mechanism
- With the vacuum unplugged, press and hold the red bar for 30 seconds
- Release and then rapidly press and release the bar 10 times
- Let the mechanism rest for 5 minutes
- Test to see if normal function has returned
Advanced Repair Options for Persistent Issues
Replacing the Entire Upright Lock Unit
If individual repairs haven’t resolved your recline issues, replacing the entire upright lock unit may be necessary:
If after trying to fix the lock mechanism you determine it needs to be replaced, here is a product recommendation.
Dyson Dc25 Upright Lock Unit
Dyson Upright Lock Assembly #DY-915937-01
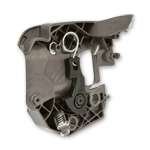
Official Dyson upright lock assembly replacement
916201-01 Upright Lock Assembly for DC25
High-quality compatible upright lock assembly for DC25
- Purchase a replacement upright lock unit (available from Dyson parts suppliers)
- Follow the disassembly steps outlined earlier to access the internal components
- Disconnect any wiring harnesses connected to the lock unit (take photos before disconnecting to aid reassembly)
- Remove any screws or fasteners securing the lock unit
- Install the new unit, ensuring proper alignment with all connection points
- Reconnect any wiring harnesses in their original positions
- Reassemble the vacuum and test the recline function
Professional Repair Considerations
If DIY repairs seem too complex or haven’t resolved the issue, professional assistance may be your best option:
- Check if your vacuum is still under warranty (Dyson typically offers 5-year warranties)
- Contact Dyson customer support at 0800 397 667 for guidance
- Inquire about Dyson’s repair service options and associated costs
- Consider authorized third-party repair services that specialize in Dyson vacuums
Preventative Maintenance Tips
To avoid future recline problems with your DC25, implement these preventative measures:
- Regularly clean around the recline mechanism to prevent debris buildup
- Apply a light lubricant to hinge points every 6 months
- Avoid forcing the vacuum to recline if resistance is felt
- Store the vacuum in the upright locked position
- Periodically check and tighten any visible screws around the handle and ball unit
Frequently Asked Questions (FAQ)
Why does my Dyson DC25 only recline slightly when I press the red bar?
This typically indicates a partially functioning recline mechanism. The most common causes are a loose screw in the upright lock mechanism or partially damaged sliding brackets. Follow the troubleshooting steps in this article to access and inspect these components. In many cases, simply tightening the loose screw in the upright lock mechanism will restore full recline functionality.
Can I replace parts of the recline mechanism myself?
Yes, many components of the DC25 recline mechanism can be replaced by users with basic mechanical skills. The most commonly replaced parts include the sliding brackets and the upright lock unit. These repairs require only basic tools like a Torx screwdriver. However, if you’re uncomfortable with disassembling your vacuum, professional repair is recommended to avoid potential damage.
How do I know if my DC25 recline problem is covered under warranty?
Dyson typically provides a 5-year warranty on their vacuums that covers mechanical failures, including recline mechanism issues. To determine if your vacuum is still under warranty, locate the serial number (usually found on the main body of the vacuum) and contact Dyson customer support at 0800 397 667. Be prepared to describe the issue in detail and provide proof of purchase if available.
Is there a temporary fix I can use until I can properly repair my DC25?
If you need a temporary solution, try this workaround: when using the vacuum, apply gentle backward pressure on the handle while pressing the red release bar. This can sometimes compensate for a weak recline mechanism. Additionally, applying a silicone-based lubricant to the hinge points may provide temporary relief until a proper repair can be performed.
Why did my DC25 suddenly stop reclining after working fine for years?
Sudden recline failures often occur due to a component breaking or coming loose after extended use. The most common culprit is the screw in the upright lock mechanism loosening over time due to the vacuum’s vibrations. This type of failure is more common in vacuums that have been in service for several years, as the repeated stress on mechanical components eventually leads to wear and failure.
Conclusion
The Dyson DC25’s recline mechanism, while ingeniously designed, is susceptible to various issues that can impair its functionality over time. By understanding the underlying mechanics and following the detailed troubleshooting steps outlined in this guide, most users can successfully restore their vacuum’s recline capabilities without professional assistance.
Regular maintenance plays a crucial role in preventing these issues from developing. By keeping the mechanism clean, properly lubricated, and promptly addressing any loose components, you can significantly extend the operational life of your DC25’s recline function.
Remember that while DIY repairs can save money and time, some situations may warrant professional intervention, especially if the internal components show significant damage or if multiple repair attempts have been unsuccessful. Dyson’s customer support remains a valuable resource for guidance specific to your vacuum’s condition and repair needs.


