
Dyson vacuums are known for their powerful suction and innovative design, but even the most reliable machines can experience problems over time. The Dyson DC25 is particularly susceptible to suction loss issues, which can significantly impact its cleaning performance. When your once-powerful vacuum starts struggling to pick up debris, it’s frustrating but typically fixable with the right approach.
Affiliate disclosure: As an Amazon associate, We'll earn a commission for every successful order through our affiliate links in the article. However, you won’t be charged anything for this.
In this comprehensive guide, we’ll explore the most common causes of suction loss in the Dyson DC25 and provide detailed troubleshooting steps to restore your vacuum to optimal performance. From clogged filters and blocked airways to mechanical issues, we’ll cover everything you need to know to diagnose and fix your Dyson DC25 suction problems without necessarily requiring professional repair services.
Common Causes of Suction Loss in Dyson DC25
The Dyson DC25 features a sophisticated design with multiple components that work together to create powerful suction. When any of these components becomes compromised, suction performance suffers. Here are the primary culprits behind suction loss:
Clogged Filters
The DC25’s dual-filter system is designed to trap fine dust particles, but these filters require regular maintenance:
- Pre-Motor Filter: Located in the cyclone assembly, this filter protects the motor from dust infiltration
- Post-Motor Filter: Situated in the ball component, this HEPA filter captures microscopic particles before air is expelled
- Impact on Performance: When filters become clogged with dust and debris, airflow becomes restricted, resulting in diminished suction power
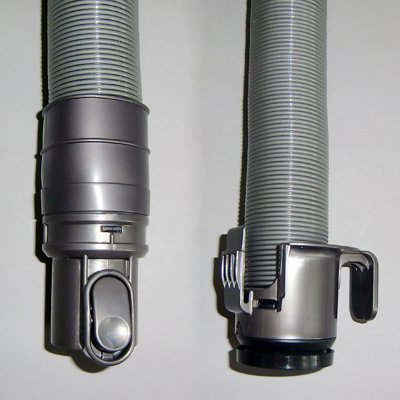
Blocked Airways and Hoses
The DC25 features a complex system of airways that can become obstructed:
- Main Hose: Runs down the back of the vacuum
- Changeover Valve Hose: Connects the main hose to the vacuum head
- Lower Duct Hose: Located near the cleaner head
- Wand: Can develop hidden blockages, particularly at connection points
Damaged Seals and Hoses
Air leaks significantly impact suction performance:
- Torn Hoses: Even small splits or tears can cause substantial suction loss
- Damaged Seals: Compromised seals allow air to escape, reducing vacuum efficiency
- Connection Points: Loose connections between components create air leaks
Brush Bar Issues
The rotating brush bar plays a crucial role in carpet cleaning:
- Entangled Hair/Debris: Reduces brush effectiveness and restricts airflow
- Worn Bristles: Diminish cleaning performance over time
- Motor Problems: Prevent the brush from rotating properly
Changeover Valve Malfunctions
This critical component directs suction between the cleaner head and the hose:
- Stuck Valve: Prevents proper airflow direction
- Debris Accumulation: Blocks valve movement
- Mechanical Failure: Causes improper suction routing
Comprehensive Troubleshooting Guide for DC25 Suction Problems
Cleaning and Maintaining Filters
Proper filter maintenance is essential for maintaining suction power:
Pre-Motor Filter Maintenance:
- Locate the pre-motor filter in the cyclone assembly
- Remove the filter carefully
- Rinse under warm (not hot) water until water runs clear
- For stubborn dirt, gently scrub with a soft brush
- Shake excess water and let dry completely for at least 24 hours
- Never reinstall damp filters as this can damage the motor and create electrical hazards
- Replace if visibly worn or damaged
Post-Motor Filter Maintenance:
- Locate the post-motor filter in the ball component
- Remove the filter by twisting counterclockwise
- Rinse thoroughly under warm water
- Shake the filter 10 times to dislodge trapped particles
- Allow to dry completely for 24 hours minimum
- Reinstall only when completely dry
Maintenance Schedule: Clean both filters every 3 months under normal usage conditions, or more frequently with heavy use.
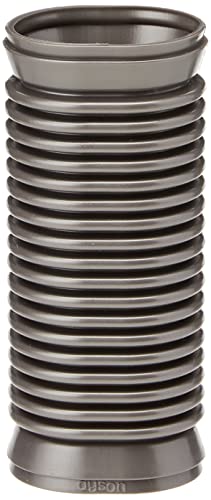
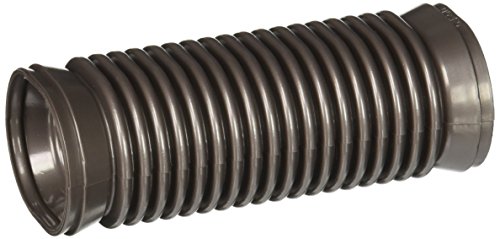
Checking and Clearing Hose Blockages
Blockages in the hose system are a leading cause of suction problems:
Main Hose Inspection:
- Disconnect the hose from both ends
- Visually inspect for blockages using a flashlight
- Remove any visible obstructions
- For stubborn blockages, use a long, flexible tool (like a straightened wire hanger) to carefully dislodge debris
- Test airflow by blowing through the hose or running water through it (ensure it’s completely dry before reinstalling)
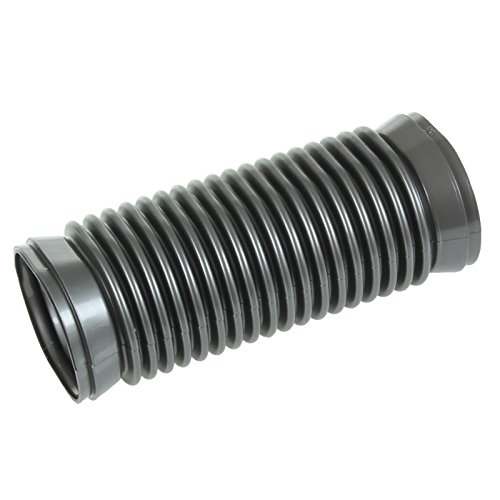
If the main hose is damaged beyond repair or heavily clogged, a replacement ensures optimal airflow.
Genuine Dyson replacement for DC25 models

Affordable alternative with extended reach

Premium option with enhanced suction

Budget-friendly with color match
Wand Blockage Removal:
- Detach the wand from the vacuum
- Look through both ends to check for obstructions
- Pay special attention to the clear plastic cap inside the wand handle, which can cause blockages
- Remove any visible debris
- For persistent blockages, run warm water through the wand and tap it gently to dislodge material
- Allow to dry completely before reattaching
Checking for Dense Blockages:
- Look for compacted debris like “pucks” of shredded paper that commonly form in the airway
- Check all connection points where debris tends to accumulate
- Use needle-nose pliers to remove stubborn blockages
Inspecting and Repairing Hoses and Seals
Air leaks significantly impact suction performance:
Visual Inspection:
- Carefully examine all hoses for cracks, splits, or tears
- Pay special attention to connection points where wear is common
- Check all seals for signs of damage or deterioration
- Inspect the lower duct hose near the cleaner head, a common failure point
Testing for Leaks:
- Remove the cleaner head
- Test suction at the point where it connects to the vacuum
- If suction is strong at this point but weak during normal operation, you likely have a leak
Repair Options:
- For minor tears, high-quality duct tape can provide a temporary fix
- For permanent repairs, replace damaged hoses or seals
- Ensure all connections are tight and secure when reassembling
If you find that the lower duct hose is damaged, it should be replaced to maintain proper suction.
Official Dyson replacement for DC25 vacuum
OEM-authorized third-party alternative
Third-party compatible replacement
Addressing Changeover Valve Issues
The changeover valve is a frequent source of suction problems:
Locating and Accessing the Valve:
- Recline the vacuum and remove the cleaner head
- The changeover valve is located near the bottom of the vacuum, behind where the head connects
Clearing Obstructions:
- Use needle-nose pliers to manually manipulate the valve
- Remove any debris blocking the valve movement
- Check for small objects (like plastic golf tees, clear tubing, or pens) that commonly cause obstruction
- Ensure the valve moves freely between positions
Secondary Filter Check:
- Locate the secondary filter on the left-hand side of the vacuum
- Unscrew and remove it
- Inspect the valve mechanism where debris often accumulates
- Remove any pet hair or small objects like socks that may be trapped
- Test the valve’s movement by lowering the vacuum arm – it should transition smoothly between wand and roller head suction
Maintaining the Brush Bar
A properly functioning brush bar is essential for carpet cleaning:
Cleaning the Brush Bar:
- Turn off and unplug the vacuum
- Recline the vacuum and locate the brush bar
- Use scissors to carefully cut away any entangled hair or strings
- Remove the brush bar according to the user manual instructions
- Clean thoroughly, removing all debris from the bar and its housing
- Check for wear on the bristles and bearings
Addressing Rotation Issues:
- Ensure the brush control is set to “ON” for carpet cleaning
- Check if the brush bar spins freely when manually rotated
- Inspect for obstructions preventing rotation
- If the brush bar won’t spin even when clear of obstructions, the belt may need replacement
Checking the Brush Roll Reset Switch
The reset switch can prevent the brush roll from functioning:
- Confirm the vacuum’s motor is operational
- Disassemble the switch mechanism according to the user manual
- Check if the reset switch is misaligned or worn
- Correct the reset switch’s position if necessary
- Test by repositioning the switch and checking brush roll operation
- Inspect the wiring harness (loom wire) for damage
Addressing Motor Issues
Motor problems require careful diagnosis:
Symptoms of Motor Problems:
- Unusual noises during operation
- Burning smell
- Intermittent operation
- Complete loss of suction
Diagnostic Steps:
- Listen for abnormal sounds that might indicate bearing failure or other mechanical issues
- Check for burning odors that suggest motor overheating
- Ensure the thermal cut-out hasn’t been triggered due to overheating
- Allow the vacuum to cool completely if thermal cut-out is suspected
Resolution Options:
- For thermal cut-out issues, clear all blockages and allow cooling
- For persistent motor problems, replacement parts are available
- Consider professional repair for complex motor issues
Frequently Asked Questions (FAQ)
Why does my Dyson DC25 lose suction after a few minutes of use?
This typically indicates a thermal cut-out issue. The vacuum shuts off when it overheats due to restricted airflow. Check for blockages in the hoses and airways, and ensure your filters are clean and completely dry. Also verify all seals are intact and there are no air leaks in the system. Allow the vacuum to cool completely before restarting.
How often should I clean the filters on my Dyson DC25?
Under normal household use, clean both the pre-motor and post-motor filters every 3 months. If you have pets or vacuum frequently, you may need to clean them more often. Always allow filters to dry completely for at least 24 hours before reinstalling them to prevent motor damage and ensure optimal suction.
My Dyson DC25 brush bar isn’t spinning. What should I check?
First, ensure the brush control is set to “ON.” If it still doesn’t spin, check for hair or debris wrapped around the brush bar and remove it. Inspect the belt for damage or wear. If these steps don’t resolve the issue, check the reset switch mechanism, which may have disengaged due to a previous jam, or examine the wiring harness for damage. Replace the brush bar if it’s worn (Replacement part: Dyson DC25 Brush Bar Assembly).
What’s the best way to check for blockages in my Dyson DC25?
Systematically check each airway component. Start by removing the hose and visually inspecting it with a flashlight. Next, check the wand by looking through both ends. Remove the cleaner head and check the connection point. Pay special attention to the changeover valve area, which commonly collects debris. For hidden blockages, you may need to run warm water through components (ensuring they dry completely before reassembly).
The upright positioning mechanism on my DC25 isn’t working properly. How can I fix it?
This common issue occurs when the metal peg connected to the foot release pedal misaligns with its groove. Apply pressure to the pedal to manually dislodge the peg and reposition it into the groove. This may need to be done periodically if the misalignment recurs. For a permanent fix, check for any damaged components in the locking mechanism.
Conclusion
The Dyson DC25 is a powerful and effective vacuum cleaner when properly maintained, but suction loss issues can significantly impact its performance. By systematically checking filters, airways, hoses, seals, and mechanical components as outlined in this guide, you can diagnose and resolve most suction problems without professional assistance.
Regular maintenance—particularly filter cleaning, emptying the dustbin after each use, and checking for blockages—can prevent many common issues before they develop. Pay special attention to the changeover valve and brush bar, as these components frequently contribute to suction problems.
With proper care and timely troubleshooting, your Dyson DC25 can continue to deliver the powerful cleaning performance it was designed for, extending the life of your investment and maintaining a cleaner home environment.


