
When your Dyson DC07 vacuum cleaner’s hose stops picking up debris effectively, it can be frustrating and leave your cleaning routine in disarray. This powerful upright vacuum is known for its cyclonic technology and reliable performance, but like all vacuum cleaners, it can develop suction issues over time.
Affiliate disclosure: As an Amazon associate, We'll earn a commission for every successful order through our affiliate links in the article. However, you won’t be charged anything for this.
In this comprehensive guide, we’ll explore the common causes behind your Dyson DC07’s hose suction problems and provide detailed, step-by-step solutions to get your vacuum working like new again. Whether you’re dealing with a completely dead hose or just noticing diminished suction power, the troubleshooting steps outlined below will help you identify and fix the problem without necessarily requiring professional repair services.
Common Causes of Dyson DC07 Hose Suction Loss
The Dyson DC07 is an engineering marvel, but several components can affect its suction performance. Before diving into complex repairs, it’s important to know what might be causing your vacuum’s hose to lose suction:
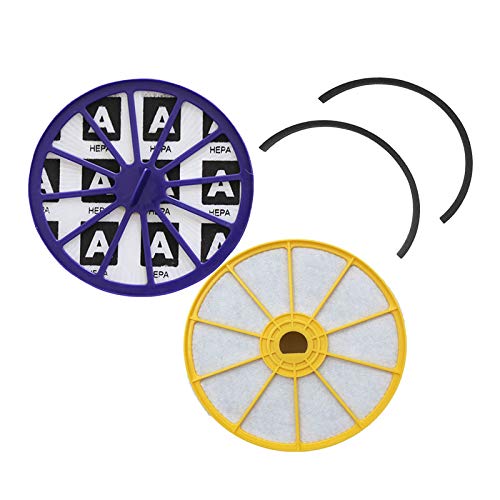
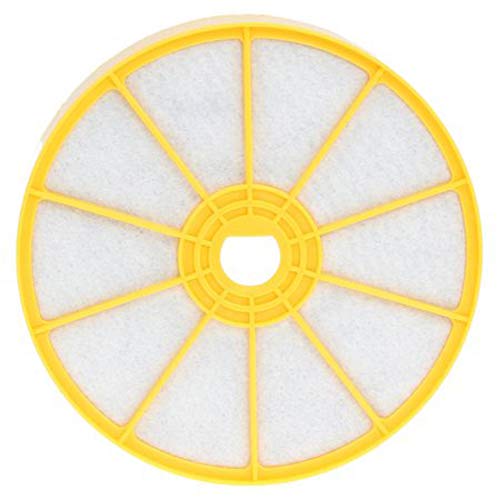
Clogged Filtration System
The DC07 utilizes a dual-filter system that requires regular maintenance:
- Pre-motor filter – Located near the dust bin, this washable filter prevents debris from entering the motor
- Post-motor filter – Found under a cap near the motor, this filter (HEPA in some models) captures fine particles before air exits the vacuum
When these filters become clogged with dust and debris, airflow is restricted, resulting in poor suction through the hose.
Blockages in the Hose System
Your DC07’s suction path includes several components where blockages commonly occur:
- External hose – The flexible tube you use for above-floor cleaning
- Internal hose – Hidden pathways inside the vacuum body
- Valve pipe assembly – The mechanism that directs suction between floor cleaning and hose use
A clog in any of these areas can significantly reduce or completely eliminate suction power.
Physical Damage to Hoses
The flexible nature of vacuum hoses makes them vulnerable to:
- Tears and splits from stretching
- Cracks from age and regular use
- Punctures from sharp objects
- Collapsed sections from excessive bending
Even small damage to the hose creates air leaks that dramatically reduce suction efficiency.
Motor and Fan Issues
The heart of your vacuum’s suction power comes from its motor and fan system:
- Unusual noises often indicate motor problems
- Debris caught in the fan can reduce performance
- Worn motor bearings affect overall suction capability
Height Adjustment Mechanism Problems
The DC07 features an auto height adjuster that optimizes floor contact:
- This small grey component at the front of the floor unit can become stuck
- When malfunctioning, the brush may not make proper contact with the floor
- Improper brush contact leads to poor pickup performance
Clutch Belt Failures
The clutch belt controls the height selection mechanism:
- Worn or damaged belts prevent proper functionality in upright position
- This affects how the vacuum transitions between floor and hose modes
Comprehensive Troubleshooting Process
Inspecting and Cleaning the Filters
Dirty filters are the most common cause of suction loss in Dyson vacuums. Here’s how to properly maintain them:
Locate both filters:
- The pre-motor filter is easily accessible near the dust bin
The post-motor filter is under a cap near the motor housing
Remove the filters:
- The pre-motor filter pulls straight out
The post-motor filter requires removing a cover first
Clean thoroughly:
- Rinse the pre-motor filter under cold running water until water runs clear
- Gently squeeze excess water (never twist or wring)
- For HEPA models, follow specific manufacturer instructions for the post-motor filter
Allow complete drying:
- Let filters air dry for at least 24 hours
Never reinstall damp filters as this can damage the motor and promote mold growth
Reinstall properly:
- Ensure filters are seated correctly
- Check for gaps or improper alignment
Pro tip: Mark your calendar to clean filters every 3 months for optimal performance.
If your pre-motor or post-motor filters are damaged, or you simply want to have a spare set on hand for uninterrupted cleaning, consider purchasing replacements.

Official Dyson replacement for DC07 vacuum
Comprehensive filter kit with air purification

Budget-friendly compatible filter solution
Warranty-backed air quality upgrade
Clearing Hose Blockages
If your filters are clean but suction remains poor, blockages in the hose system are the likely culprit:
Disconnect the hose completely:
- Remove it from both the vacuum body and wand
Lay it out straight on the floor
Visual inspection:
- Look through the hose toward a light source
Identify any visible obstructions
Physical inspection:
- Run your hand along the exterior to feel for crushed sections
Check for cracks, splits, or holes
Clear obstructions:
- For visible blockages, use a broom handle or similar long object to gently push through debris
- For stubborn clogs, carefully use a wire coat hanger with the sharp end covered
- Flush with water if necessary (ensure complete drying before reinstalling)
Test suction:
- Reconnect one end to the vacuum
- Place your hand over the other end while the vacuum runs
- You should feel strong, consistent suction
Examining the Internal Hose
If the external hose is clear but suction problems persist, the internal hose might be affected:
Access the internal hose:
- Remove the valve pipe assembly
This requires removing several screws and clips
Inspect for damage:
- Check for splits, tears, or disconnections
Look for debris buildup
Clear or replace as needed:
- Clean any blockages
- If damaged, replacement is typically necessary (Dyson part #904125-14)
If you find that the internal hose is damaged beyond repair, replacing it is the best option to restore optimal suction.

Official replacement with durable construction and included cuffs
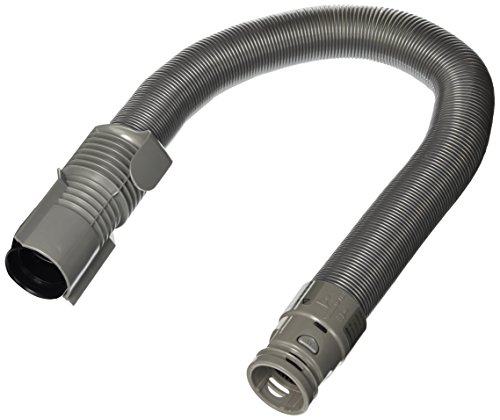
Authorized OEM replacement with standard durability

Budget-friendly alternative with core functionality
Color-specific alternative with extended reach
Checking the Auto Height Adjuster
A malfunctioning height adjuster affects how the brush head contacts the floor:
Locate the adjuster:
It’s the small grey component at the front of the floor unit
Test functionality:
- The adjuster should move freely up and down
It should automatically adjust when transitioning between floor types
Clean and lubricate:
- Remove debris from around the mechanism
Apply a small amount of silicone-based lubricant if movement is stiff
Replace if necessary:
- If broken or severely worn, replace the entire component
Inspecting the Clutch Belt
The clutch belt is crucial for proper mode switching:
Access the clutch mechanism:
Remove the floor head to expose the clutch
Check condition:
- Look for stretching, fraying, or breakage
Ensure proper tension and alignment
Replace damaged belt:
- Remove the clutch completely
- Use snap ring pliers to release the small round pin holding the spring
- Install new clutch belt (Dyson part #10-1345-08)
- Reassemble in reverse order
Examining Motor and Fan Health
If all other components check out, motor issues might be the cause:
Listen for abnormal sounds:
- Grinding indicates bearing issues
- Whining suggests motor strain
- Rattling points to loose components
Inspect the fan
- Remove necessary covers to access the fan
- Check for debris caught in fan blades
- Look for cracks or damage
Clean carefully:
- Use compressed air to blow out dust
Remove hair and string wrapped around the fan shaft
Consider professional help:
- Motor replacement often requires specialized tools and expertise
- Contact Dyson support if motor issues are suspected
Advanced Diagnostic Techniques
Testing Suction at Different Points
This methodical approach helps pinpoint exactly where suction is being lost:
Test at the machine inlet:
- Remove the cleaner head
- Place your hand over the opening
- If suction is strong here but weak at the hose, the issue is in the hose system
Test at the hose base:
- Disconnect the hose from the wand
- Test suction at the machine end
- This identifies if the problem is in the hose itself or the wand
Test with different attachments:
- Try various tools to see if the issue is attachment-specific
- This can identify blockages in specific tools
Inspecting the Changeover Valve
The changeover valve directs suction between floor cleaning and hose use:
Access the valve:
- Remove the ball cover and filter
Look for the large plastic piece (resembling a golf tee)
Check for obstructions:
- Use needle-nose pliers to remove debris
Ensure the valve moves freely
Test operation:
- Manually flip the valve to verify smooth movement
- Ensure it properly seals in both positions
Examining the U-Bend Connection
The U-Bend connects the hose to the vacuum base:
- Locate the U-Bend:
It’s where the hose attaches to the bottom of the vacuum
Check for damage:
- Look for cracks or loose connections
Ensure proper seating
Replace if necessary:
- A broken U-Bend requires replacement (Dyson part #904125-32)
- Installation requires removing several screws and careful reassembly
Frequently Asked Questions (FAQ)
Why does my Dyson DC07 have strong suction from the bottom but none through the hose?
This typically indicates a problem with the changeover valve. When you pull the wand up for hose use, a valve inside the vacuum redirects suction from the floor head to the hose. If this valve is stuck or clogged, suction won’t reach the hose. Remove the ball cover and filter, then locate the large plastic piece inside the valve. Clear any debris and ensure it moves freely.
How often should I clean the filters on my Dyson DC07?
For optimal performance, clean both filters every 3-6 months under normal household use. If you have pets or use the vacuum daily, increase cleaning frequency to every 1-3 months. Always allow filters to dry completely (at least 24 hours) before reinstalling them in the vacuum.
My Dyson DC07 won’t stay locked in the upright position. How does this affect hose suction?
When the DC07 fails to lock upright, it affects the changeover mechanism that directs suction to the hose. To fix this common issue, gently lift the small chute on the vacuum’s handle upward while raising the handle to its full height. This realigns the locking mechanism. If this doesn’t work, the clutch belt may need replacement, as it controls the height selection system.
Can I repair a split or torn Dyson DC07 hose myself?
While temporary repairs using duct tape or specialized vacuum hose repair tape are possible, they rarely provide a lasting solution. For optimal performance, replace a damaged hose with a genuine Dyson part. The DC07 hose replacement is relatively affordable and will restore full suction power. Installation involves removing the wand from the hose using the clip at the bottom, detaching the end assembly, and replacing the entire hose unit.
Why is my Dyson DC07 Animal more prone to hose problems?
The DC07 Animal was designed for homes with pets, meaning it typically handles more hair and dander than standard models. This additional strain can accelerate wear on the hose system. Additionally, the Animal model’s hose material can become brittle over time, especially if stored in areas with temperature fluctuations. Regular inspection and maintenance can help extend the life of your Animal model’s hose system.
Conclusion
The Dyson DC07’s hose suction problems are often solvable with systematic troubleshooting and regular maintenance. By addressing common issues like clogged filters, blockages, damaged hoses, and mechanical failures, you can restore your vacuum’s performance without expensive professional repairs.
Remember that prevention is the best approach – regular filter cleaning, prompt removal of blockages, and careful handling of the hose will extend your Dyson’s lifespan and maintain its powerful suction. If replacement parts are needed, investing in genuine Dyson components will ensure proper fit and function.
With the comprehensive guide above, you now have the knowledge to diagnose and fix virtually any suction issue affecting your Dyson DC07’s hose system. Happy cleaning!


