
Affiliate disclosure: As an Amazon associate, We'll earn a commission for every successful order through our affiliate links in the article. However, you won’t be charged anything for this.
That satisfying click of your Dyson Supersonic’s power switch is gone. Now it’s stiff, unresponsive, or won’t stay in position. When your dyson hair dryer on off switch not working, your styling routine comes to an abrupt halt. This isn’t just an inconvenience, it’s a disruption to your daily routine that demands immediate attention. Whether your switch feels gritty, won’t click into place, or has completely failed after two years of reliable service, this guide delivers the precise troubleshooting steps and repair options you need to restore your premium hair dryer.
Diagnosing Your Dyson Supersonic’s Switch Failure Symptoms
Before grabbing tools, accurately identify what’s wrong with your switch. The symptoms determine your repair path and whether you can fix it yourself or need professional help.
Identifying Stiff, Stuck, or Unresponsive Switch Behavior
Your Dyson’s switch should move smoothly between positions with a distinct tactile click. When it fails, you’ll notice specific symptoms:
- Stiff or Stuck Switch: The rocker requires excessive force to move upward while sliding down easily. It may not “get all the way up” or lock into position properly.
- Mushy or Spongy Feel: The switch lacks the crisp tactile feedback, feeling “spongy” with inconsistent travel distance.
- Complete Failure: No response when toggling the switch, no lights, sounds, or airflow despite proper power connection.
- Intermittent Operation: The dryer only works when holding the switch in a specific awkward position.
Testing for Complete Power Failure vs. Switch-Specific Issues
Determine if the problem is isolated to the switch or indicates a broader electrical failure:
- Power Source Verification: Test your Dyson in multiple outlets with known-working devices. If other appliances work but your dryer doesn’t, the issue is likely internal.
- Visual Inspection: Under good light, check for visible cracks, discoloration, or melting around the switch housing that indicates an internal short circuit.
- Filter Check: Remove and clean all intake filters thoroughly, as blocked airflow can sometimes trigger safety cutoffs that mimic switch failure.
- Tactile Feedback Test: Gently work the switch while listening for faint clicks, this confirms whether the microswitch inside is engaging.
What’s Really Causing Your Dyson Switch to Fail

Understanding the root cause prevents wasted effort and guides you toward the right solution for your specific dyson hair dryer on off switch not working issue.
Mechanical Wear and the Plastic Component Breakdown
The switch mechanism contains plastic components rated for 10,000+ cycles, but heavy use wears them down:
- The plastic slider and housing degrade over time, especially with daily use (3-7 times per week)
- Dust and hair product residue accumulate inside the mechanism, causing grittiness
- The internal spring fatigues or breaks, eliminating the tactile “click” and proper return force
- Most failures occur between 2-3 years of moderate use as plastic components reach their mechanical life limit
Failed Solder Joints on the Power Board
This is one of the most common failure points that presents as a switch problem:
- The switch is soldered directly to the main PCB inside your dryer
- Thermal cycling from heating/cooling causes solder joints to crack over time
- Physical impacts (even minor drops) can fracture these connections
- This often creates intermittent problems where the switch works only in certain positions
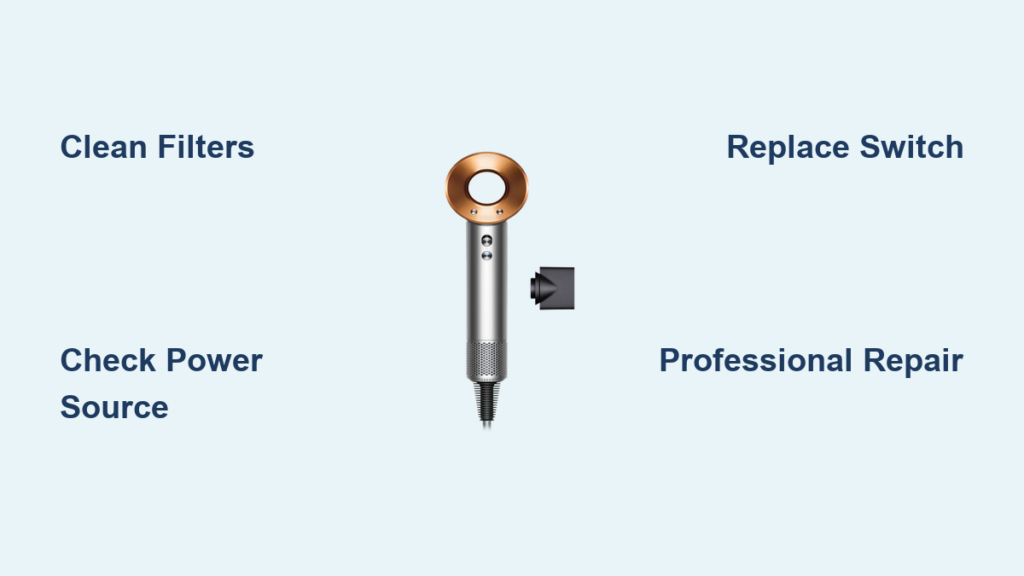
Immediate Troubleshooting Steps Before Opening Your Dryer
Don’t risk voiding your warranty by opening the unit prematurely. Try these non-invasive fixes first for your dyson hair dryer on off switch not working issue.
Power Source and Outlet Verification
Many apparent switch failures are simply power issues:
- Test multiple outlets on different circuits in your home
- Use a dedicated surge protector (minimum 1000 Joules rating) as Dyson electronics are sensitive to voltage spikes
- Check your home’s circuit breaker. Dyson dryers can trip GFCI outlets when sharing circuits with other high-draw appliances
Filter Cleaning and Basic Maintenance Checks
Blocked airflow can trigger safety mechanisms that mimic switch failure:
- Remove the front nozzle by pressing the small tabs
- Clean the magnetic ring and filter thoroughly with a soft brush
- Remove the rear filter cover and clean the secondary filter
- Inspect all vents for hair and debris buildup that restricts airflow
Pro Tip: Clean filters monthly to prevent thermal issues that strain internal components.
Step-by-Step Switch Repair Process for Dyson Supersonic Models
If basic troubleshooting fails, these precise steps will guide your repair, whether you’re replacing the switch yourself or verifying a professional’s work.
Essential Tools for Switch Replacement
Gather these specific tools before starting (P/N 976239-01 is the switch assembly part number):
- Precision Phillips #00 screwdriver
- T8 or T10 Torx Security bit (for the security screws with center pins)
- Plastic spudger tool or small flathead screwdriver
- Tweezers for handling small components
- Soldering iron and lead-free solder (for switch replacement)
Opening Your Dyson Hair Dryer Without Voiding Warranty
Warning: Opening your dryer voids the warranty if it’s still active. Only proceed if out of warranty (standard warranty is 2 years).
- Unplug the dryer and ensure it’s completely powered off
- Remove the front nozzle by pressing the tabs and sliding it off
- Gently pull off the magnetic ring and filter
- Remove the rear filter cover and secondary filter
- Locate and carefully remove the 8-10 Torx Security screws (typically T8 or T10)
- Gently separate the handle halves, watching for connecting cables
Replacing the Faulty Switch Assembly (P/N 976239-01)

- Locate the switch assembly soldered to the main logic board
- Inspect solder joints for cracks or “halo” rings indicating failure
- If replacing: Desolder the old switch using proper technique
- Install the new switch assembly (cost: approximately $10-20)
- Test continuity across switch terminals before reassembly
- Reassemble in reverse order, ensuring all cables are properly seated
Critical Warning: If you’re not experienced with PCB soldering, this step risks damaging your dryer permanently. The average DIY success rate is low without proper electronics repair skills.
When Professional Repair Beats DIY Fixes
Weigh these factors carefully before attempting complex repairs on your dyson hair dryer on off switch not working issue.
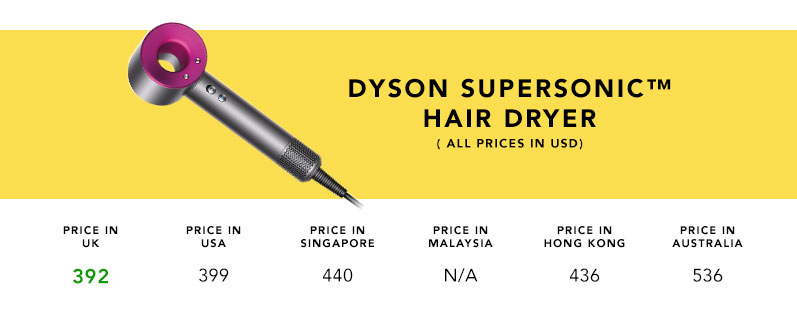
Cost Comparison: $99 Dyson Repair vs. $450 New Unit
Dyson’s out-of-warranty repair pricing makes financial sense for most users:
- Official Dyson repair: $99 flat rate for switch or power board replacement
- Third-party repair: $50-150 depending on the technician and location
- New unit cost: $299-$450 for current models
- DIY parts cost: Approximately $10-20 for the switch assembly
Smart Decision: For most users, the $99 official repair offers the best value, preserving your investment while avoiding the risk of further damage from improper DIY attempts.
Finding Authorized Service Centers vs. Third-Party Repair
Contact Dyson first for the safest repair path:
- Call 1-866-MY-DYSON (1-866-693-9766) for direct service options
- Use the online portal at support.dyson.com to schedule service
- Provide your serial number (format: P2Y-US-XXXXXXX) for accurate assessment
- Consider third-party repair only if Dyson service isn’t available in your region
Pro Tip: Some users report success with electronics repair shops specializing in small appliance repairs, they often charge less than Dyson while maintaining quality.
Preventing Future Switch Failures in Your Dyson Dryer
Extend your dryer’s lifespan with these specific maintenance practices targeting the most common failure points.
Surge Protection Strategies for Sensitive Electronics
Dyson’s internal components are highly vulnerable to power fluctuations:
- Always use a surge protector rated for at least 1000 Joules
- Avoid sharing circuits with high-draw appliances like curling irons
- Unplug during electrical storms or extended non-use periods
- Consider a UPS (uninterruptible power supply) for critical protection
Proper Cleaning and Maintenance Schedule
Follow this routine to prevent switch mechanism degradation:
- Weekly: Wipe the switch area with a dry microfiber cloth to remove product residue
- Monthly: Clean all intake filters thoroughly as described earlier
- Quarterly: Test switch operation and listen for unusual sounds
- Annually: Consider professional inspection if used heavily (daily)
Critical Safety Note: Discontinue use immediately if the switch feels hot, shows discoloration, or emits burning smells, these indicate dangerous electrical issues requiring professional attention.
When your dyson hair dryer on off switch not working, the solution depends on accurate diagnosis. Most switch failures stem from mechanical wear in the plastic components or cracked solder joints on the power board, both repairable issues that shouldn’t force you to buy a new $450 unit. For most users, Dyson’s $99 out-of-warranty repair offers the safest, most cost-effective solution. If attempting DIY repair, focus first on cleaning and basic troubleshooting before risking damage by opening the unit. Implementing a regular maintenance schedule with proper surge protection can extend your dryer’s life significantly beyond the typical 2-3 year switch failure point. With the right approach, you’ll restore that satisfying click and keep your styling routine flowing smoothly.


