

The Dyson DC40 is a powerful vacuum cleaner known for its excellent suction capabilities. However, over time, you might notice a decrease in its performance, particularly when it comes to suction power. This can be frustrating, especially when you’re in the middle of cleaning your home and suddenly realize your vacuum isn’t picking up debris as effectively as it once did.
Affiliate disclosure: As an Amazon associate, We'll earn a commission for every successful order through our affiliate links in the article. However, you won’t be charged anything for this.
Suction loss in a Dyson DC40 can manifest in several ways, including decreased cleaning performance, unusually noisy operation, or noticeably weaker airflow. The good news is that many suction issues can be resolved through proper diagnosis and simple fixes without requiring professional help or expensive replacements. In this comprehensive guide, we’ll walk through the common causes of suction loss in the Dyson DC40, provide detailed diagnostics, and offer step-by-step solutions to restore your vacuum’s performance.
Common Causes of Dyson DC40 Suction Problems
When your Dyson DC40 starts losing suction power, several culprits could be responsible. Let’s examine the most frequent causes and how to identify them:
Blockages in the Hose System
One of the most common reasons for suction loss is blockages in the vacuum’s hose system. Debris such as hair, string, or small objects can get lodged in the hose, creating a barrier that restricts airflow.
To diagnose this issue:
1. Detach the hose from the vacuum
2. Inspect both ends and the interior for any visible obstructions
3. Use a flashlight to check for blockages that might not be immediately visible
If you find a blockage, use a long, thin object like a straightened coat hanger or a pipe cleaner to carefully dislodge the debris. Work from both ends of the hose if necessary, and ensure the entire length is clear before reattaching it to the vacuum.
Full or Improperly Sealed Dust Container
A full or improperly sealed dust container can significantly reduce your Dyson’s suction power. When the container reaches its capacity, air cannot flow efficiently through the system.
To check and fix this issue:
1. Examine if the dust container is full or approaching capacity
2. Press the release button at the bottom of the container to detach it
3. Empty the contents completely into a trash bag
4. Clean the container’s interior if necessary
5. Ensure the container clicks securely back into place when reattached
Remember that even a partially filled container can impact performance, so regular emptying is recommended for optimal suction.
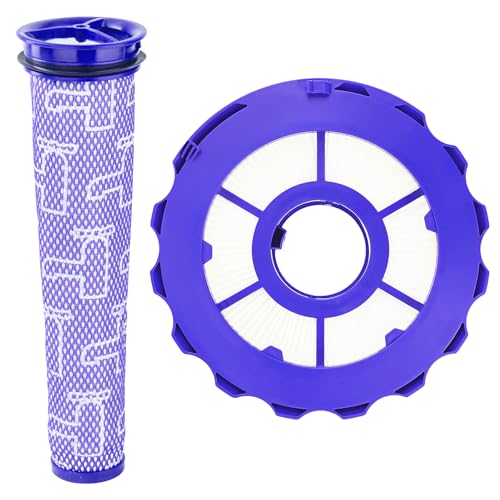
Clogged or Dirty Filters
The Dyson DC40 uses filters to trap fine dust particles and prevent them from being released back into your home. When these filters become clogged, they restrict airflow and reduce suction power.
To address filter issues:
1. Locate both the pre-motor and post-motor filters
2. Remove them carefully according to the manufacturer’s instructions
3. Inspect for visible dirt, dust accumulation, or clogs
4. Rinse the filters under cold running water until the water runs clear
5. Allow the filters to dry completely (at least 24 hours) before reinstalling
6. Ensure they’re properly seated when reinstalled
Never use a vacuum with wet filters, as this can damage the motor and potentially create electrical hazards.
If your filters are damaged or too old, consider replacing them to restore your Dyson’s suction power.

Premium kit with extended filtration lifespan and cleaning tool

Balanced value with dual-filter sets for standard replacement

Cost-effective solution with high-efficiency filtration
HEPA-optimized set for improved air quality
Advanced Diagnostics and Troubleshooting
If the basic troubleshooting steps don’t resolve your suction issues, it’s time to move on to more advanced diagnostics and fixes.
Examining the COV Hose for Blockages
The COV (Cleaner Outer Valve) hose is a critical component located behind the lower cord hook. This area is particularly prone to clogs that can significantly impact suction.
To check and clear the COV hose:
1. Keep the machine in an upright position
2. Remove the wand and main hose
3. Locate the hard plastic pipe that connects to the upper part of the canister
4. Inspect this area thoroughly for any obstructions
5. Use a wire or long, thin tool to carefully dislodge any clogs
6. Reattach all components securely after clearing the blockage
Many users report finding surprising items in this area, from pet toys to food debris, which can completely block airflow.
Cleaner Head Inspection and Maintenance
Problems with the cleaner head assembly can significantly impact your vacuum’s performance. Issues might include a worn-out brush roll, a torn active base plate, or an incorrectly fitted soleplate.
For a thorough cleaner head diagnosis:
1. Remove the cleaner head by taking off the red clip underneath
2. Turn the vacuum on and recline it
3. Check for suction at the front of the vacuum where the head attaches
4. If suction at this point matches the hose suction, the head is likely the problem
5. Clean the assembly thoroughly, paying special attention to:
– The brush bars (remove any tangled hair or string)
– The internal chambers for dust accumulation
– The spindle alignment (the keyed flat surface must align with the raised portion)
6. Reassemble carefully, ensuring all parts fit correctly
Identifying and Fixing Air Leaks
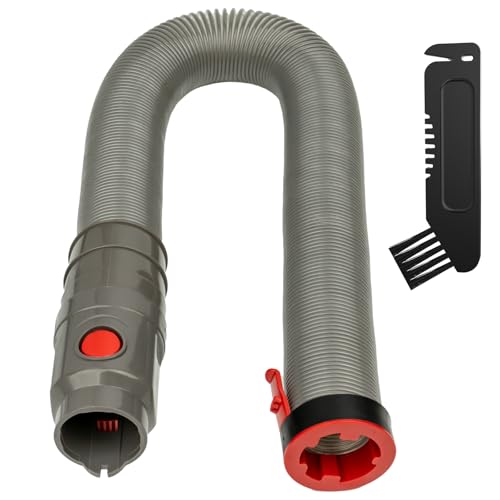
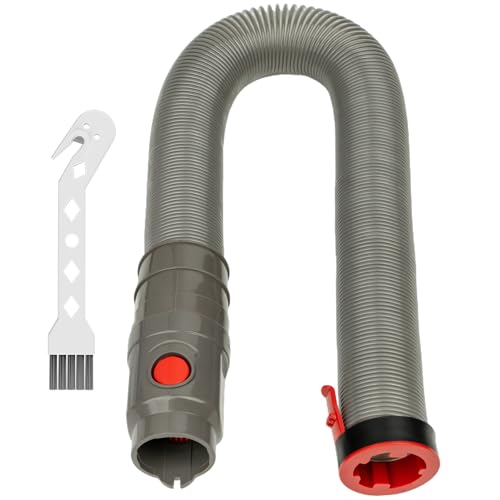
Air leaks can occur from damaged pipes or improper connections, causing a significant reduction in suction power. A particularly common issue is cracks in the suction hose leading to the front roller attachment.
To diagnose potential air leaks:
1. After clearing all blockages and cleaning filters, check for suction consistency
2. Compare the suction at different parts of the vacuum
3. If there’s good suction at the cyclone end but poor suction at the head connector, suspect an air leak
4. Inspect all connections and hoses for cracks or damage
If you identify a cracked suction hose, replacement is necessary. The process involves:
1. Removing the rear casing (four T10 screws)
2. Dislodging the spring-loaded clip
3. Releasing the hose from its connector
4. Installing the new hose by aligning its teeth with the connector’s grooves
5. Ensuring the rubber seal is properly seated
6. Reattaching the plastic bracket and securing with appropriate screws
7. Reinstalling the casing and testing suction
If you’ve found a crack in your Dyson DC40’s hose, you’ll need a replacement to restore proper suction.

Official replacement for Dyson DC40 upright vacuum

Enhanced compatibility with extended model support
Affordable third-party alternative with cleaning tools
Durable hose with hair-removal functionality
Cyclone System Maintenance
The cyclone system is the heart of your Dyson’s suction mechanism. When clogged with fine dust and debris, it can significantly reduce efficiency.
To properly maintain the cyclone system:
1. Disassemble the cyclone chamber using appropriate tools
2. Remove any caked dust and dirt from the cyclone fins
3. Clean thoroughly but gently to avoid damaging the delicate components
4. Ensure all parts are completely dry before reassembly
5. Verify all seals are properly positioned during reassembly
Regular maintenance of this system can prevent many suction issues before they become severe.
Frequently Asked Questions (FAQ)
Why does my Dyson DC40 make a strange noise when losing suction?
When your Dyson makes unusual noises while experiencing suction loss, it typically indicates the motor is working harder to compensate for restricted airflow. This could be due to blockages in the hose, cyclone system, or filters. The noise often resembles a high-pitched whine or labored sound. First, check for blockages in all pathways, then inspect and clean the filters. If the noise persists after clearing all obstructions, there might be an issue with the motor itself, which may require professional attention.
How often should I clean the filters on my Dyson DC40?
Dyson recommends washing the filters at least once every three months under normal household use. However, if you have pets, allergies, or vacuum frequently, you should clean them more often—approximately once a month. Always ensure filters are completely dry (at least 24 hours of air drying) before reinstalling them. Using wet filters can damage your vacuum’s motor and reduce its lifespan.
Why does my Dyson DC40 have good suction through the hose but not the cleaner head?
This common issue typically indicates a problem with the connection between the cleaner head and the main vacuum system. First, check for blockages in the pathway from the cleaner head to the hose. Next, inspect the cleaner head itself for tangled hair or debris around the brush bar that might be preventing proper rotation. Also examine the tiny hose inside the ball at the back of the vacuum, as dust accumulation here can restrict airflow. If these checks don’t resolve the issue, the suction hose connecting the cleaner head might be cracked and require replacement.
Can using my Dyson DC40 to vacuum inappropriate materials cause suction loss?
Yes, vacuuming materials the DC40 isn’t designed for can cause immediate or gradual suction loss. Items like wet substances, fine powders (plaster dust, flour, etc.), or sharp objects can clog filters, damage the cyclone system, or puncture hoses. These materials can also accumulate in areas difficult to access during regular maintenance. If you’ve recently vacuumed something unusual and notice suction loss, perform a thorough inspection of all components, paying special attention to the hose system and filters.
Is it worth repairing my Dyson DC40 or should I replace it?
Most suction issues with the Dyson DC40 can be resolved through proper maintenance and minor repairs, making repair a cost-effective option. Parts like filters, hoses, and brush rolls are relatively inexpensive (typically £10-£20) compared to a new vacuum (£200-£300). If your vacuum is less than 5-7 years old and the motor still functions properly, repairs are usually worthwhile. However, if multiple components need replacement or the motor shows signs of failure (unusual noises, overheating, or intermittent operation), replacement might be more economical in the long run.
Conclusion
Suction loss in a Dyson DC40 vacuum cleaner can be frustrating, but with proper diagnostics and maintenance, most issues can be resolved without professional help. By systematically checking for blockages in the hose system, ensuring the dust container is properly emptied and sealed, maintaining clean filters, and addressing potential issues with the cleaner head or cyclone system, you can restore your vacuum’s performance to its original power.
Regular maintenance is key to preventing suction problems before they start. Emptying the dust container frequently, cleaning filters according to the manufacturer’s recommendations, and checking for hair or string tangled in the brush roll after each use will help maintain optimal performance. By implementing these preventative measures and knowing how to diagnose and fix common issues, you can extend the life of your Dyson DC40 and ensure it continues to clean effectively for years to come.
Remember that most repairs, such as replacing a cracked suction hose or cleaning the cyclone system, are significantly more cost-effective than purchasing a new vacuum. With the right approach to maintenance and troubleshooting, your Dyson DC40 can continue to provide powerful suction and excellent cleaning performance throughout its lifespan.


