
Affiliate disclosure: As an Amazon associate, We'll earn a commission for every successful order through our affiliate links in the article. However, you won’t be charged anything for this.
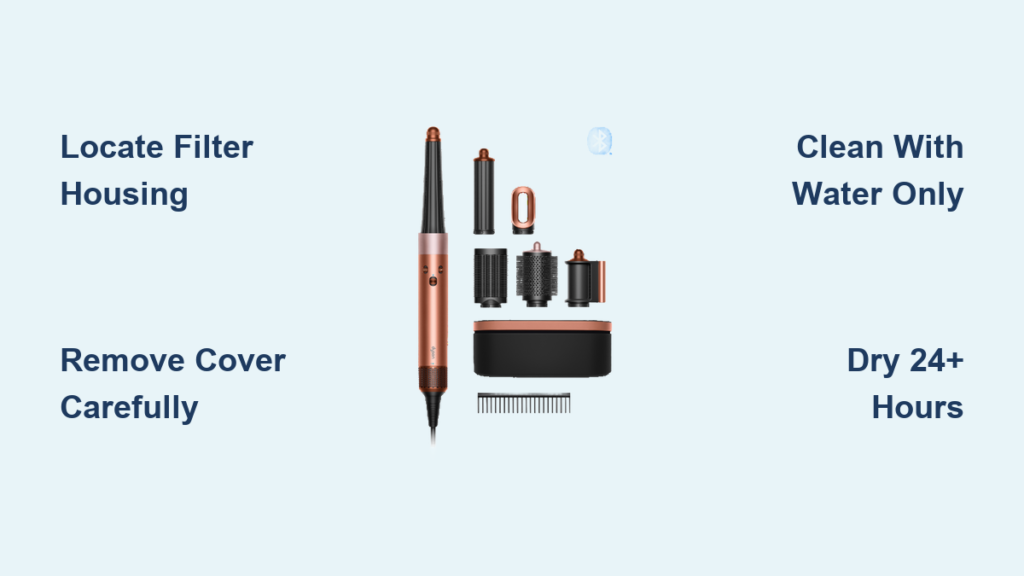
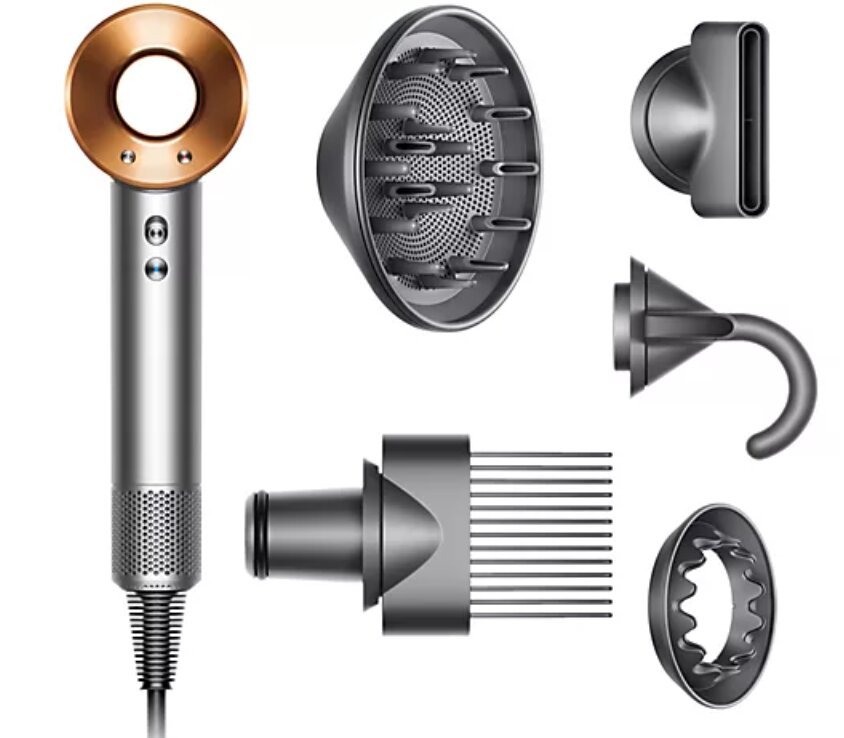
Your Dyson Airwrap suddenly can’t hold a curl? Does it take twice as long to dry hair or feel unusually hot during styling? A clogged filter is almost certainly strangling your device’s performance. Unlike disposable filters in vacuums, your Airwrap’s reusable filter traps hair and dust that directly choke motor airflow—sabotaging styling power and risking expensive damage. This isn’t just about convenience; a dirty filter forces the motor to overwork, shortening your $600 styler’s lifespan. The good news? Cleaning it takes less time than your morning routine and requires only water. In this guide, you’ll learn exactly how to locate, safely remove, and properly maintain your Airwrap filter to restore salon-quality results. Skip this critical step, and you’re essentially styling with half the machine’s power.
Locate the Filter Housing on Your Airwrap Handle
Stop searching attachments or the barrel—your Airwrap’s filter lives on the main handle where airflow enters the motor. To find it:
1. Unplug your device and set it on a clean, dry surface with the control buttons facing away from you.
2. Rotate the handle until you see the smooth, curved back panel below the motor housing.
3. Look for a 1.5-inch circular panel with fine perforations (about 2mm holes) near the base. This isn’t decorative—it’s the filter cover.
Visual cue: When clean, light should visibly pass through these holes. If the panel looks uniformly gray or blocked, your filter needs immediate attention. No tools are required to access it, but never force the cover—Dyson’s latch is designed for fingertip operation only.
Safely Remove the Filter Cover Without Damage

Critical first step: Your Airwrap must be unplugged and cooled for 10+ minutes. A warm motor housing can cause burns or internal damage during handling. Once cooled:
How to Unlock the Filter Cover Latch
The cover uses a single spring-loaded tab on its lower edge—no screws or hidden mechanisms. Here’s the exact technique:
– Place your thumb on the top edge of the cover and press inward toward the handle (not outward).
– Simultaneously, slide your fingernail or a plastic spudger under the bottom edge where the latch clicks.
– Apply gentle upward pressure until you hear a soft click. The cover will pop open 1/8 inch.
Pro tip: If resistance feels excessive, recheck that the device is fully cooled. Forced prying cracks the housing—a $120 repair Dyson won’t cover under warranty.
Extracting the Filter Without Tears
Once the cover is open:
1. Peel back the cover fully—it hinges at the top.
2. Pinch the foam filter’s center with thumb and forefinger (avoid the edges—it’s fragile when wet).
3. Pull straight out; it shouldn’t require wiggling. If stuck, check for hair strands caught under the rim.
Warning: Never yank or twist. The filter’s elastic edges tear easily, creating gaps where unfiltered air enters the motor.
Clean the Filter Correctly: Avoid 3 Costly Mistakes
Dyson’s foam filter isn’t just a screen—it’s a precision-engineered airflow regulator. Clean it wrong, and you’ll degrade its structure. Follow this exact method:
Hand-Washing Without Soap or Damage
- Water only: Submerge the filter in lukewarm tap water (max 30°C/86°F). Hot water melts the adhesive binding the foam layers.
- No agitation: Swirl gently for 15 seconds—never rub, wring, or scrub. Vigorous handling collapses the foam cells, reducing filtration.
- Rinse twice: Hold under slow-running water until runoff runs clear. Cloudy water means residual hair product buildup.
Why no soap? Residue clogs micro-pores and off-gasses during heating, creating chemical odors in your hair.
Drying the Filter: The Make-or-Break Step
This is where 90% of users fail. A damp filter causes catastrophic motor failure:
– Lay flat on a microfiber towel—never hang or crumple.
– Air-dry at room temperature for at least 24 hours. Humid climates? Wait 48 hours.
– Zero shortcuts: Hair dryers, ovens, or sunlight warp the foam. Microwave drying melts it instantly.
Test for dryness: Press the center firmly. If any moisture transfers to your finger, wait another 12 hours.
Quick Dust Removal for Busy Days
For light buildup between deep cleans:
1. Hold the filter 6 inches from compressed air nozzle.
2. Spray in 2-second bursts at 45-degree angles (not straight on).
3. Tap gently against your palm to dislodge trapped particles.
Never use canned air upside down—that expels propellant that degrades foam.
Reinstall the Filter to Prevent Air Leaks

A misaligned filter creates turbulence that sounds like a jet engine and cuts suction by 40%. Get this right:
Critical Alignment Steps
- Verify seating grooves: The housing has two U-shaped channels at 3 and 9 o’clock.
- Insert the filter’s tabs first: Angle the filter so its top edge hooks into the upper housing lip.
- Press bottom corners: Firmly snap the lower tabs into their channels—listen for twin clicks.
Visual check: Run your finger around the edge. If it catches or gaps appear, reseat immediately.
Securing the Cover Without Breaking It
- Align the cover’s top hinge with the handle’s groove.
- Press the bottom edge inward until it clicks—never the center.
- Test security: Gently tug the cover. It shouldn’t budge. If loose, reopen and reseat the filter.
Warning: A loose cover vibrates off during styling, exposing the motor to hair—causing instant shutdown.
How Often to Clean Based on Your Hair Type

Cleaning frequency isn’t one-size-fits-all. Match your schedule to these real-world scenarios:
When to Clean Immediately
- Fine or straight hair users: Every 8 weeks (product buildup is minimal, but dust accumulates fast).
- Thick/curly hair or heavy product users: Every 4 weeks (hairspray and oils clog filters 3x faster).
- Pet owners: Every 3 weeks (pet hair felts into the foam, blocking airflow completely).
The Light Test: Your Performance Gauge
Hold the filter against a bright window:
– ✅ Clean: Light passes evenly through all areas (honeycomb pattern visible).
– ⚠️ Needs cleaning: Patchy light or opaque sections near the center.
– ❌ Critical: No light penetration—suction drops 70% at this stage.
Pro tip: Set phone reminders labeled “Airwrap Filter Check” based on your usage tier. Waiting for performance loss means your motor’s already stressed.
Avoid These 4 Dangerous Airwrap Filter Mistakes
Mistake #1: “I’ll just rinse it quickly under the tap”
Consequence: Water seeps into the motor housing through the open cover, shorting circuitry.
Fix: Always remove the filter before washing—never clean it while installed.
Mistake #2: “It’s damp but I’ll let it dry while I style”
Consequence: Moisture vaporizes inside the hot motor, causing corrosion within 3 uses.
Fix: Treat dryness like a safety check—no reassembly until bone-dry.
Mistake #3: “I’ll replace it with a vacuum filter”
Consequence: Non-Dyson foams melt at styling temperatures, releasing toxic fumes.
Fix: Dyson confirms this filter isn’t user-replaceable. If torn, contact support—never improvise.
Mistake #4: “I’ll skip cleaning since suction seems fine”
Consequence: Dust abrasion wears motor brushes prematurely. Average repair cost: $180.
Fix: Clean proactively using the light test—performance loss is the last symptom.
Restore Peak Performance: Your Filter Maintenance Checklist
A clean filter isn’t maintenance—it’s performance optimization. After cleaning:
– Run the Airwrap on high for 2 minutes without attachments to verify smooth airflow.
– Note the sound: A clean unit hums quietly; gritty noises mean residual debris.
– Check styling time: Curls should form 30% faster with restored suction.
Long-term care strategy:
1. Wipe the filter cover’s interior monthly with a dry microfiber cloth.
2. Store your Airwrap in a closed cabinet (not the bathroom) to reduce humidity exposure.
3. Never use heat tools near the filter cover—melts the plastic latch.
If reduced suction persists after filter cleaning, check the air intake vents on the handle base—these also trap hair and require weekly clearing with a soft brush. For persistent issues, Dyson’s warranty covers motor diagnostics if filter maintenance logs are provided.
Final note: Your Airwrap’s filter is its respiratory system. Treat it like your lungs—clean air in, optimal performance out. Spend 5 minutes every month on this task, and your styler will deliver professional results for 5+ years instead of failing prematurely. Now unplug that Airwrap and give it the breath of fresh air it deserves—your next flawless blowout depends on it.
![How To Carry Dyson Air Purifier? [Best Tips]](https://dfixing.com/wp-content/uploads/2026/03/Dyson-Air-Purifier-3-1024x576.png)