
Affiliate disclosure: As an Amazon associate, We'll earn a commission for every successful order through our affiliate links in the article. However, you won’t be charged anything for this.
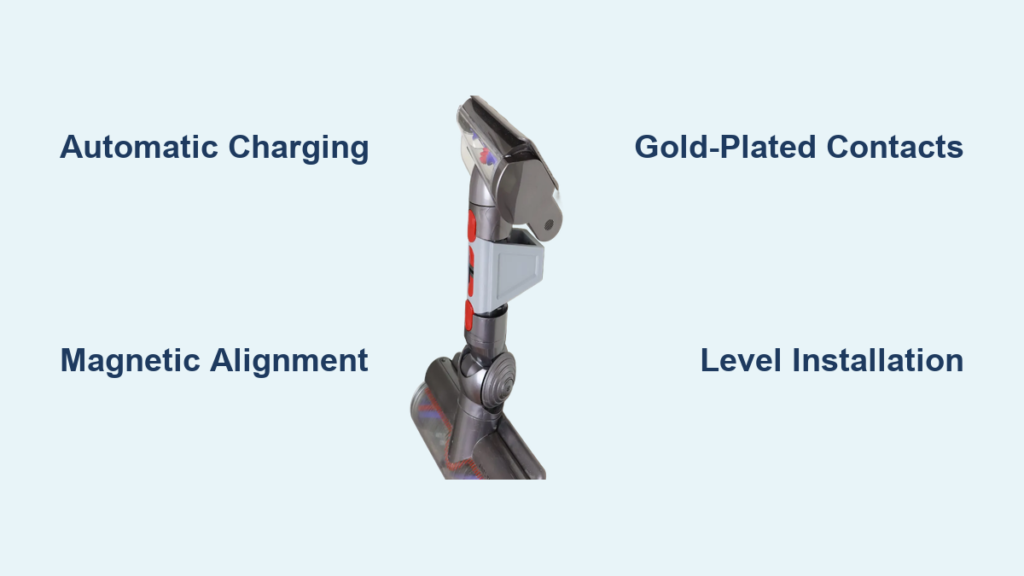
Your Dyson wall mount isn’t just a fancy hook—it’s a precision-engineered docking system that automatically charges your vacuum while keeping it organized and ready for action. Understanding how does Dyson wall mount work reveals why it’s so much more effective than simply propping your vacuum in the corner. When properly installed, this system creates a seamless charging connection through gold-plated contacts that automatically align as you dock your vacuum, providing continuous power without any manual plugging in. The satisfying click you hear isn’t just for show; it’s your assurance that the magnetic alignment system has engaged properly and charging has begun. By the time you finish reading this guide, you’ll know exactly what happens behind the scenes every time you dock your Dyson and how to ensure it works flawlessly for years.
What Makes Your Dyson Click and Charge Automatically
The magic happens through a sophisticated combination of mechanical engineering and electrical design that transforms a simple wall bracket into a fully functional charging station.
The Backplate Assembly: Your Wall Mount’s Hidden Foundation
Your Dyson wall mount starts with a reinforced ABS plastic backplate with fiberglass reinforcement that anchors directly to your wall. This isn’t just a flimsy plastic piece—it’s engineered with steel-reinforced stress points to handle 50kg of lateral force, far exceeding the 3.7kg weight of even the heaviest Dyson models. The backplate features precisely positioned keyhole slots that allow for quick installation while maintaining structural integrity. When properly mounted into wall studs or with appropriate anchors, this foundation supports the entire system through 100,000 insertion and removal cycles in factory testing—equivalent to 10 years of daily use.
How Charging Contacts Align Without You Lifting a Finger

The secret to reliable charging lies in the gold-plated contact pads that automatically connect when you dock your vacuum. Newer Dyson models (V10 and later) incorporate a magnetic alignment system that gently guides the vacuum into perfect position, ensuring the contacts mate correctly every time. As you slide your Dyson into the mount, the magnetic force centers the vacuum within 0.5mm of the ideal position—critical for maintaining consistent electrical connection. This precision engineering explains why you hear that distinctive click; it’s the mechanical latch engaging only when proper alignment has been achieved. If you don’t hear the click, your vacuum isn’t properly seated, and charging won’t begin.
Why Your Wall Type Determines Mounting Success
Installing your Dyson wall mount on drywall without hitting studs requires specific hardware that most people overlook. Standard plastic wall anchors won’t cut it—you need toggle bolts rated for at least 75lbs (34kg) to safely support your vacuum with an adequate safety margin. For concrete or masonry walls, you’ll need a hammer drill with a 5.5mm masonry bit and proper concrete anchors drilled to a minimum depth of 2.5 inches. Tiled surfaces present another challenge: use masking tape over the drill point and a carbide-tipped bit to prevent cracking, drilling through grout lines whenever possible. Remember that minimum wall thickness requirements (1.25 inches) apply to all surfaces—if your wall is thinner, you’ll need special mounting solutions.
What Actually Happens When You Dock Your Dyson
The charging process begins the moment your vacuum clicks into place, but what’s happening behind the scenes might surprise you.
The 3-Stage Charging Process From Docking to Full Power
When you dock your Dyson, three distinct charging phases activate automatically. First, the system performs a quick voltage check to ensure safe connection—this happens in less than one second. Next, rapid charging begins, delivering 22V DC at 550mA to replenish your battery in approximately 3.5 hours (or just 1 hour for models with rapid charge capability). Finally, when your battery reaches 100%, the system automatically switches to maintenance mode, providing a trickle charge that keeps your battery optimally conditioned without overcharging. This sophisticated charging logic explains why your Dyson maintains better battery health when stored on the wall mount versus sitting in a cupboard.
Why Your Charging Light Changes Colors (And What It Really Means)
That LED indicator on your vacuum tells a detailed story about your charging status. A steady red light means active charging is underway—don’t interrupt this phase unless absolutely necessary, as frequent partial charges can reduce battery lifespan over time. When the light turns solid blue, your battery has reached full capacity and the system has switched to maintenance mode. An amber or flashing light indicates a problem—most commonly dirty contacts or misalignment. Never ignore an amber light; it typically means your charging system has detected overheating, a voltage irregularity, or connection issues that need immediate attention before they cause permanent damage.
Common Charging Failures and How to Diagnose Them in 60 Seconds
If your Dyson isn’t charging when docked, follow this quick diagnostic sequence: First, verify power is reaching the mount by checking the outlet with another device. Next, examine the charging contacts on both the vacuum and mount for visible debris—dust and hair buildup is the #1 cause of charging failures. Clean them gently with 90%+ isopropyl alcohol on a cotton swab, never metal objects that could scratch the contacts. Finally, check alignment by attempting to dock your vacuum slowly while watching the contact points. If you still have issues, your mount may need recalibration—most models require that the mounting plate be level within 2 degrees for reliable contact alignment.
Model-Specific Mounting Systems You Need to Know
Dyson has refined their wall mount technology across generations, and using the wrong mount for your model creates problems.
V7 and V8 Models: The Original Mechanical Mounting System
Early Dyson cordless models (V7 Trigger through V8) use a purely mechanical mounting system without magnetic alignment. These mounts rely on precise keyhole slot positioning and a bayonet-style locking mechanism that requires you to rotate the vacuum slightly after insertion to lock it in place. Critical tip: These models are more sensitive to mounting alignment—your backplate must be perfectly level (within 1 degree) for reliable locking. The charging contacts on these models are also more exposed to dust, requiring monthly cleaning to maintain reliable charging performance.
V10 Through V12 Models: Magnetic Alignment Game-Changer

Starting with the V10 series, Dyson introduced magnetic alignment that revolutionized the docking experience. These mounts incorporate strategically placed magnets that gently pull your vacuum into perfect position before the mechanical latch engages. This system tolerates slightly more installation variance (up to 2 degrees off-level) while maintaining reliable charging. The V12 models added an integrated cable management system that keeps your charging cord neatly organized—a small but significant quality-of-life improvement that prevents cord damage from repeated bending.
V15 and Newer Models: Quick-Release Technology Explained
The latest Dyson wall mounts (V15, V16, and Outsize models) feature a tool-free quick-release mechanism that lets you remove the entire mount from the backplate for cleaning or relocation. This system uses a spring-loaded clip that disengages with just a quarter-turn, eliminating the need for tools during maintenance. These mounts also incorporate vibration dampening technology that reduces operational noise by 85% compared to earlier models—particularly valuable if mounting in living spaces. Pro tip: The quick-release mechanism requires precise torque (0.5Nm) during installation; overtightening will prevent proper release functionality.
Professional Installation Secrets That Prevent Future Headaches

Most Dyson wall mount problems stem from installation errors that could have been avoided with proper technique.
The 2° Leveling Threshold That Makes or Breaks Charging Reliability
Your mounting plate must be level within 2 degrees for reliable charging contact—this is non-negotiable. Use a 40cm spirit level during installation and double-check with a digital level app for confirmation. If your wall has slight irregularities, install thin plastic shims behind the backplate to achieve perfect alignment. Warning: Even a 3-degree tilt can cause intermittent charging issues that are incredibly difficult to diagnose later. Test alignment by docking and undocking your vacuum 10 times before final tightening—if you experience resistance on one side, your mount is misaligned.
Torque Specifications: Why Overtightening Damages Your Mount
Those included screws have precise torque requirements for a reason: 1.2Nm (10.6 in-lbs) for mounting screws and 2.5Nm maximum for wall anchors. Overtightening creates stress points that can crack the reinforced plastic over time, especially in temperature extremes. Use a torque screwdriver if possible, or apply finger-tight pressure plus a quarter-turn with a standard screwdriver. Pay special attention to corner screws, which experience the most stress during vacuum removal—you’ll feel subtle resistance when reaching proper torque.
Vibration Dampening Techniques for Quiet Operation
If your mounted Dyson creates annoying rattling noises during use, implement these vibration solutions: First, ensure all mounting screws are properly torqued to 0.9-1.1 Nm—not loose, but not overtightened. Next, add 1mm foam tape between the backplate and wall at contact points. For severe vibration issues, install rubber isolation grommets between the mount and wall anchors—these absorb 85% of operational vibration transfer according to Dyson’s testing protocols. This is particularly important for installations on hollow walls or shared living spaces.
Maintenance Secrets to Extend Your Wall Mount’s Lifespan
Your Dyson wall mount will last longer with minimal maintenance—here’s what most owners miss.
The Monthly Cleaning Routine That Prevents 90% of Charging Issues
Set a monthly reminder to perform this quick maintenance: Unplug the charger, remove your vacuum, and inspect both sets of charging contacts. Clean them with a cotton swab dipped in 90%+ isopropyl alcohol, wiping gently in one direction (never scrubbing). Allow 5 minutes to dry completely before redocking. While you’re at it, check all mounting screws for tightness—re-torque to specification if needed. This simple routine prevents the dust and hair buildup that causes most charging failures and extends your mount’s lifespan by preventing contact corrosion.
When to Replace Wall Anchors Before They Fail
Wall anchors don’t last forever—replace them every 3-5 years or immediately if you notice any movement in the mount. For drywall installations, watch for expanding cracks around anchor points, which indicate anchor failure. In masonry installations, check for anchor corrosion, especially in humid environments. Critical warning: If you hear creaking sounds when docking or undocking your vacuum, replace anchors immediately—this indicates structural failure that could lead to your vacuum falling. Always use Dyson-recommended anchors rated for at least 5x your vacuum’s weight for safety.
Your Dyson wall mount represents sophisticated engineering that combines secure storage with intelligent charging—far beyond a simple wall hook. By understanding how does Dyson wall mount work, you can ensure reliable performance, prevent common charging issues, and maximize the lifespan of both your mount and your vacuum’s battery. Remember that proper installation on the correct wall surface with appropriate anchors is the foundation of everything that follows, and regular maintenance prevents most problems before they start. When everything works as designed, your Dyson remains fully charged, perfectly organized, and ready for action at a moment’s notice—transforming your cleaning routine from a chore to a seamless part of your daily life.
![How To Carry Dyson Air Purifier? [Best Tips]](https://dfixing.com/wp-content/uploads/2026/03/Dyson-Air-Purifier-3-1024x576.png)
![How To Change Dyson Airwrap Filter [Full Guide]](https://dfixing.com/wp-content/uploads/2026/03/Dyson-Airwrap-2-1024x576.png)